Ken Hall (KenH) has recorded a piece called Manhattan Skyline on his Clavinova CVP-809, and has downloaded VideoPad from NCH Software to make a video to go with his recording. I thought this would be a good opportunity to go through the VideoPad program step by step, explaining at first hand how to apply some of the features of this program in a practical situation. Below is how I have tackled this project. Ken will also be making a video of his Manhattan Skyline, but choosing his own video clips and doing it in his own way. Ken will be putting his video up in his YouTube Channel. YouTube has been giving everyone a 'handle' to make it easier to remember and go to someone's Channel directly. These 'handles' all have an @ in the addresses. This is something unique with YouTube and has nothing to do with email addresses!
It's all about the music ♫ ♪ ♫ Organ: Yamaha AR80 & Keyboard: Tyros 4 .. Challenge Winner 2021 May (Joint Winner); July; September 2022 July; August 2023 April; June; September
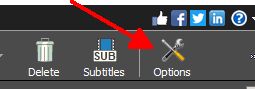
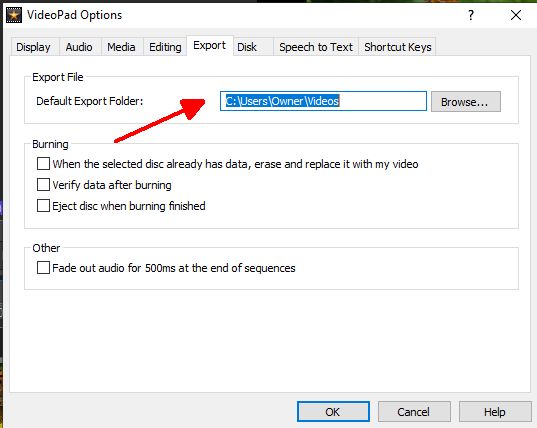
When you launch VideoPad there are 'defaults' that it uses every time. So take a look and check out what these 'defaults' are and change any that may suit you better. Once you have set the options that you want they will become the new 'defaults'. Take a look at the top right of the Home screen and click on Options.
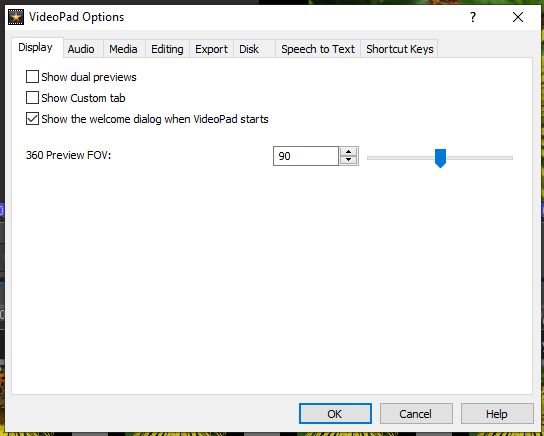
There are several 'Tabs' at the top. The first tab is Display. Yes, I do want to see the Welcome dialog when VideoPad starts, so no need to change anything on this screen.
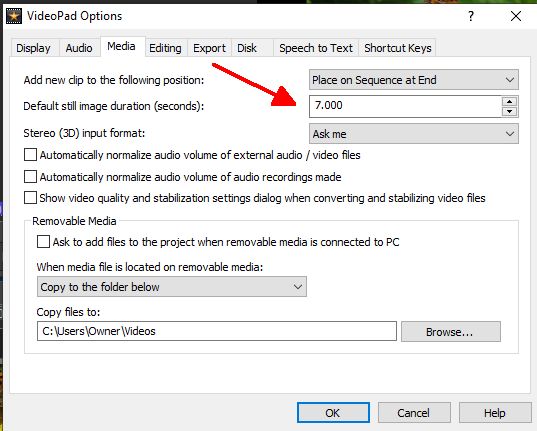
In Media, the default length of time a photo will show is 5 seconds. A bit too short, so change this to 7 seconds. Don't (ever) let the program do anything to your audio file (MP3). The MP3 you are using is you playing your organ/keyboard and presumably is already as you want to hear it. If not, then use Audacity to eg. remove 'silence' from the beginning of the track; or Normalize it.
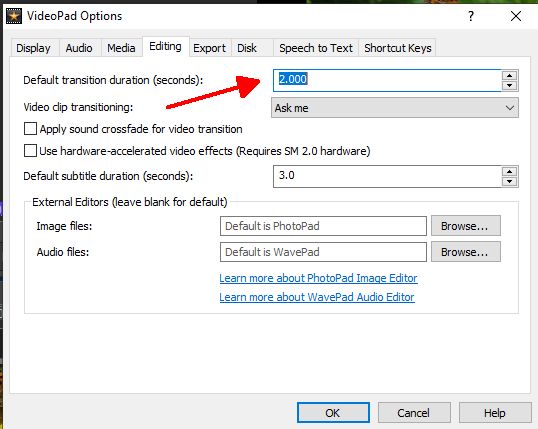
In Editing, the length of time for a Transition is fine at 2 seconds, so leave that.
This next screen (Export) shows you where it will put your final MP4 video when it has done it. Leave the default as putting it in Videos. In fact, when we reach this final step we can choose where to put this video, and I always set it to put it in the folder where all the project information is.
Everything else can be left as it is.
Next ...
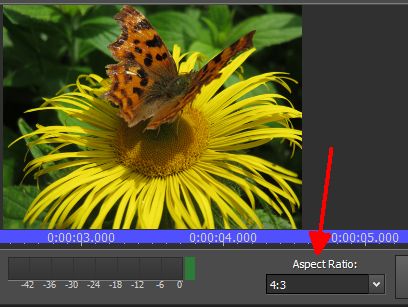
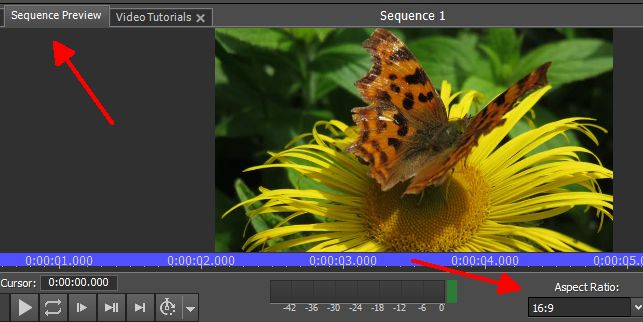
Videos for YouTube should be uploaded in one of their 'standard' formats (ratio of 'across by down') .. the main one being 16:9. Some of their older videos are 4:3, and if you are doing a video using your own photographs that are this size then that is the one to go for.
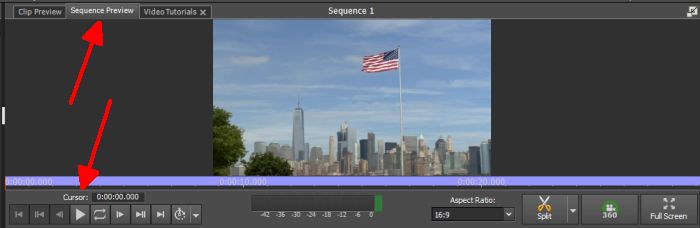
Strangely, the 'default' setting for the video you are making is not one of the 'Options'. The Aspect Ratio of the video you are about to do shows at the bottom of the Sequence Preview viewing screen (top right) as soon as you put your first photo/video clip into the program.
In this example it is a 4:3 photo.
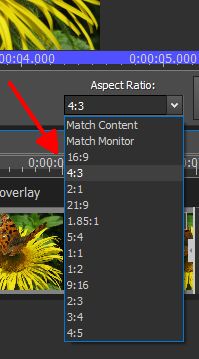
If it is not 16:9 already, then you can change this to 16:9 by clicking the down-arrow on the right and clicking on 16:9.
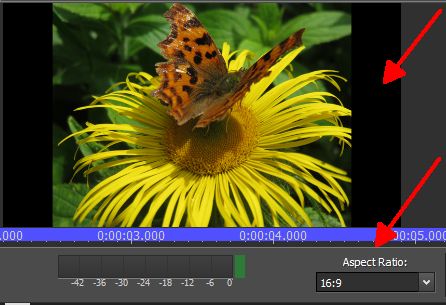
As the Aspect Ratio for the video is now 16:9 and that was a 4:3 photograph, you will get 'black bars' showing on either side.
You don't really want that, so you have to 'adjust' the photograph so it is 16:9 as well. This can be done by 'stretching' it across the screen. OK if the photo is scenery (or similar), but if there are people in the photo you wouldn't want their faces/bodies 'stretched' from side to side!
This is a bit of a diversion at this point as I really want to get on with making the video .. so maybe skip the below and come back to it later if you need to.
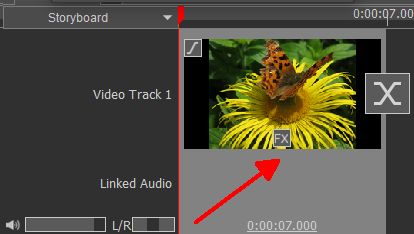
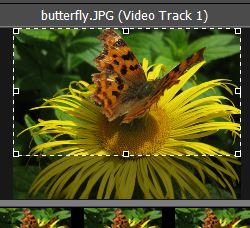
To Stretch the 4:3 photograph of the butterfly (above) click on the fx on the photograph in Video Track 1 ...
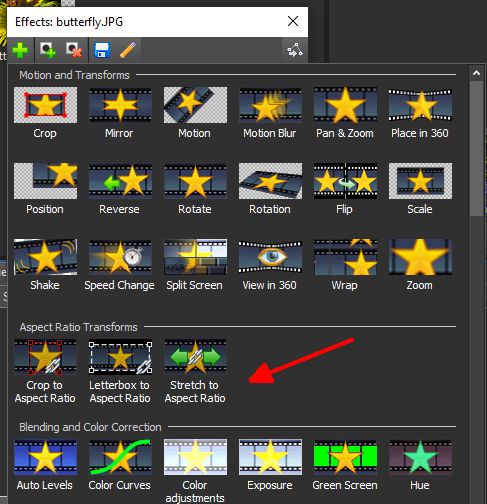
... which will give you the Effects screen. Click on Stretch to Aspect Ratio.
I'll let you judge the result (below) as to whether doing that is acceptable or not.
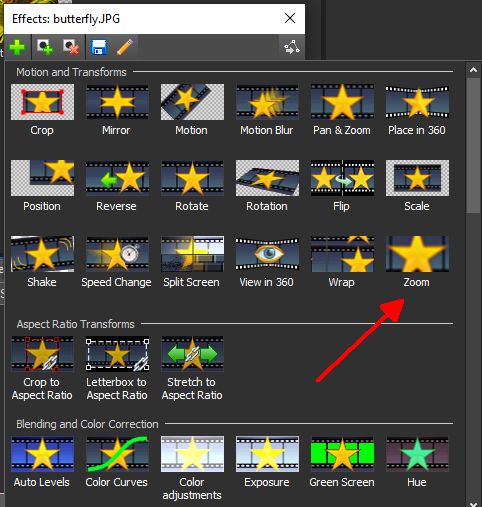
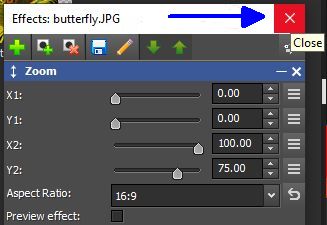
To keep the dimensions of what is in the photograph you will have to lose some of the photograph. Again, you click on the fx on the photograph, but this time choose Zoom.
You will get this screen, below.
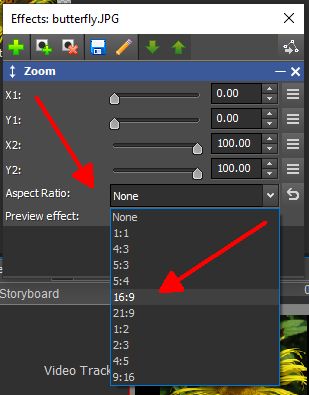
The Aspect Ratio says None. You need to click on the down-arrow, and in the drop-down box that comes up choose 16:9. This puts a 16:9 rectangle across the photograph.
If you hover your mouse anywhere within the rectangle you get a NorthSouthEastWest arrow. Click and hold with your mouse and you can drag that rectangle over the picture to where you want it. Any part of the picture that is outside that rectangle will be lost (ie. you are only keeping the 16:9 rectangle).
This is how the butterfly ends up this time. The correct size .. but you have lost some of the surrounding picture. Note that you only get to see the Aspect Ratio for the video when you are viewing in Sequence Preview .. not in Clip Preview.
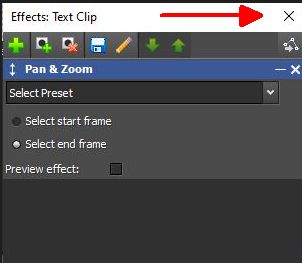
In case you are wondering how you SAVE these choices when you do them .. you click on the X in the white bar at the top. When you hover your mouse over it it says Close, with white lettering on red. It should say "Close and SAVE"!! If you click on the white X on the blue bar it will remove the effect.
I have done a DEMO showing the results of the two ways of getting rid of those 'black bars'. Click on the YouTube video below. I have done the STRETCH (to Aspect Ratio 16:9) twice; and then the ZOOM (to Aspect Ratio 16:9) twice. So this is what you see: BLACK BARS (ie. the image is 4:3 in a 16:9 video); STRETCH (to 16:9 so no Black Bars); BLACK BARS (back to 4:3 in a 16:9 video); STRETCH (no Black Bars); BLACK BARS; ZOOM (changed to 16:9, so no Black Bars); BLACK BARS; ZOOM (no Black Bars).
It's all about the music ♫ ♪ ♫ Organ: Yamaha AR80 & Keyboard: Tyros 4 .. Challenge Winner 2021 May (Joint Winner); July; September 2022 July; August 2023 April; June; September
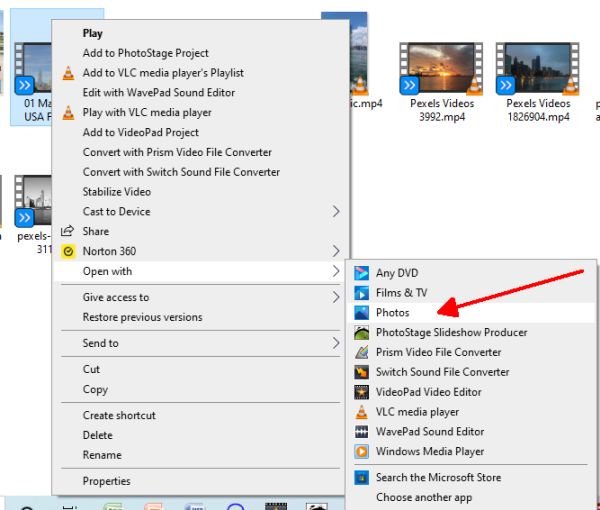
Before you even start using the VideoPad program it is always a good idea to get everything you need for making your video all together in one place and try to sort out the video clips you are going to use in to some sort of order. Although I have VLC Media Player on my laptop, I prefer to use Photos (bundled with Windows 10) to do this. VLC Media Player only loads one video at a time to watch, whereas with Photos you can view both photos and video clips one after the other by clicking the left and right arrows that appear left and right of the screen when you hover your mouse over that area.
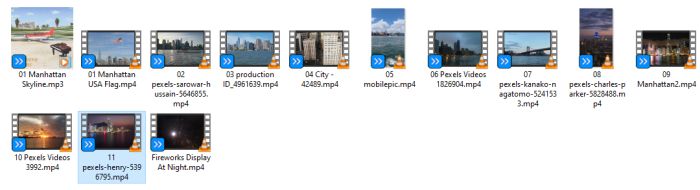
First step. I created a FOLDER called Ken Hall - Manhattan Skyline (the 'path' is Documents, 2 YouTube, Ken Hall - Manhattan Skyline). Downloaded 4min 45secs of video clips from pexels.com, putting them into that Folder. Viewed what I had put by doing a right-click on the first video clip and choosing Open with .. Photos.
I can then scroll though all of them without having to watch each video right through. I can see the file name at the top, so add an 01, 02 etc to the file name to get them in the order I want to use them (go back to File Explorer to do this). I found a clip about 14 seconds long which is the Manhattan Skyline with a dark blue sky, so earmarked that to have as the first one .. suitable for putting a Title over the top in WHITE.
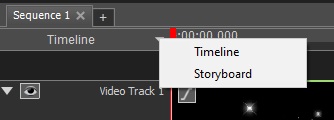
Next, I ran VideoPad and clicked on New Project. (I don't give the project a name until I save it for the first time). There are two 'modes' for viewing and manipulating VideoPad .. Timeline and Storyboard. By clicking the down-arrow you can toggle between the two.
Storyboard shows all your photos/video clips as equal rectangles along a line. Timeline shows all your photos and video clips too, but spaced along a 'timeline'. Not always easy to follow where you are. But there are certain things that you can only do when in Timeline mode. Adding your AUDIO (MP3) to the project; and creating a Title showing through a pictorial backdrop.
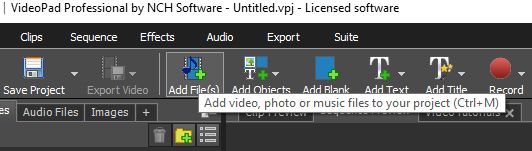
Next, I clicked on Add Files at the top.
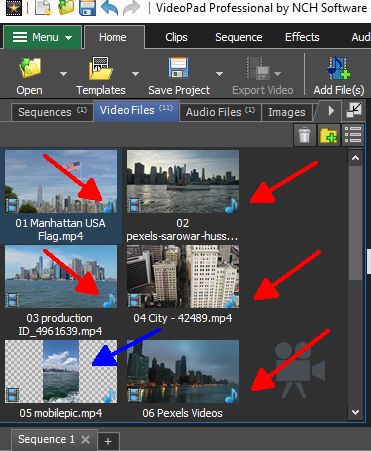
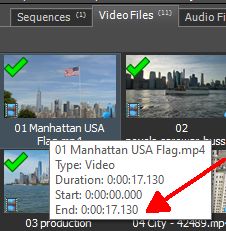
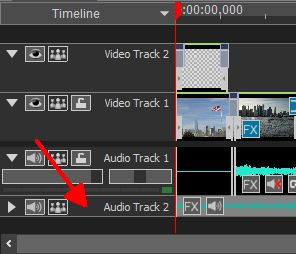
Found the folder where the files were, highlighted them all (including the Audio MP3) and clicked Open, which downloaded and sorted them into what they call the 'bin' (the top left hand area). They are sorted into Video Files; Audio Files; and Images (ie. photos). See the 'tabs' at the top of the bin?
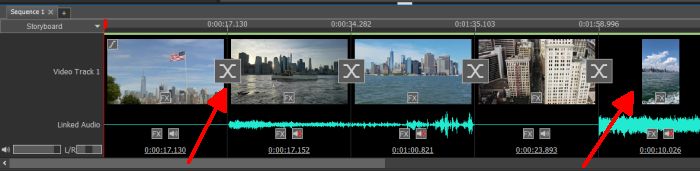
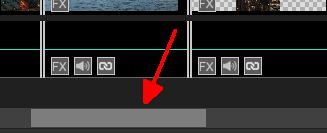
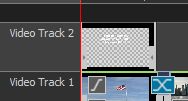
By the way, when the clips are in the 'bin' you can see a couple of very important things about them. Any clip that has 'sound' attached to the clip has a musical 'note' showing on the bottom right corner (shown by the red arrows). You wouldn't want that sound to interfere with your Audio MP3, so best to Mute these clips (easily done). Any clip or photo that is not 16:9 has some chequerboard background showing (shown by the blue arrow). This particular clip has been taken with a mobile and there is no way it could be 'adjusted' to 16:9 so I shall just leave it with 'black bars'.
Then dragged each one, one at a time onto the Video Track 1 section in Storyboard (I haven't worked out how to drop them all on there .. I think Ken has!).
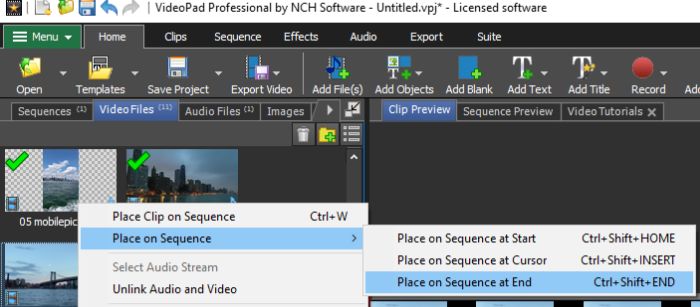
Once I reached the right hand edge of the screen I clicked on a video, did a right-click and chose Place on sequence at end.
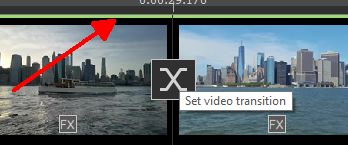
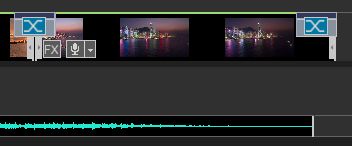
I now have all my video clips along the line, and can see that the end time is 4min 44seconds. I am also pointing out the X I have between the clips in Storyboard mode which I click on to do TRANSITIONS. These are there in Timeline mode too. I also have a couple of clips that were taken using a mobile. These can't be made 16:9 of course, so I leave them as they are and they will have 'black bars' on either side to make them fit. 16:9 is the picture size you should be aiming for for a 'standard' YouTube video.
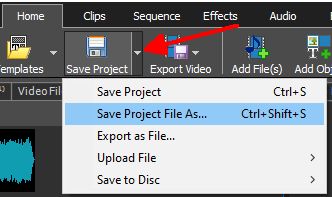
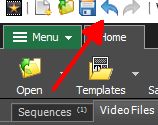
It would be a good idea to SAVE your Project at this point (before you start doing anything significant). Click on the Save Project (at the top) and choose Save Project File As...
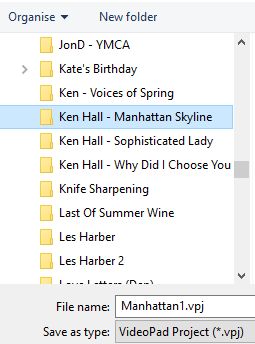
Save it in the same Folder where everything else is for this project. Give the file a name eg.Manhattan1.
It's all about the music ♫ ♪ ♫ Organ: Yamaha AR80 & Keyboard: Tyros 4 .. Challenge Winner 2021 May (Joint Winner); July; September 2022 July; August 2023 April; June; September
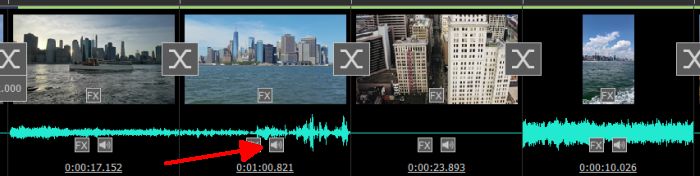
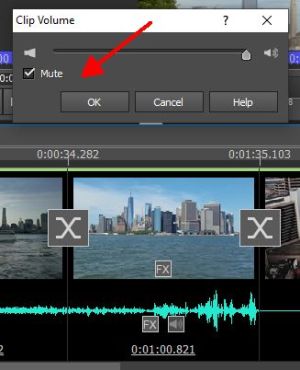
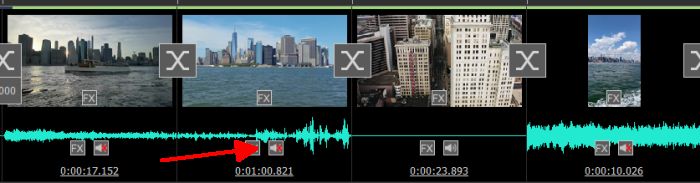
The first thing Ken pointed out to me was that there were clips with sound attached, and the sound would have to be removed from those clips or it would interfere with the music MP3. You can see which clips have significant sound on them in the screenshot below. The way to remove sound attached to a video clip is to click on the loudspeaker icon (shown by the red arrow).
A box comes up with a slider at the top to change the volume (as a %). But there is also an option to Mute the clip, so put a tick in that box and then click OK.
When the sound has been Muted a red X appears on the loudspeaker icon. This was done with all three of the clips showing.
It's all about the music ♫ ♪ ♫ Organ: Yamaha AR80 & Keyboard: Tyros 4 .. Challenge Winner 2021 May (Joint Winner); July; September 2022 July; August 2023 April; June; September
The next thing to consider is how to do the Title of the piece. I shall be putting ..
"Manhattan Skyline" played by Ken Hall on Clavinova CVP-809
.. in WHITE lettering so it shows through that first video clip. I shall be ZOOMING the words so they fill the area over a timeframe of about 14 seconds .. and then will have some Opening Doors as a Transition as it goes into the next clip. This will all be 'synced'.
Now that first clip (with the American flag flying) is 17 seconds long. This shows under the clip in Video Track 1, but also, if I hover my mouse over any of the clips in the 'bin', a drop-down box also tells me how long the clip lasts. Doing this in Audio Files will show the length of the MP3 sound track too.
Note:When working inTimelineyou may find the area you want to work with a bit compressed ie. you can't get at it properly. Look down to the bottom right and you will see a 'Zoom' button. Slide that to the right and the whole line will be expanded.
You can then grab that bar at the bottom and slide it to the right/left to position yourself on the Timeline where you want to be.
I have done this to work on this next bit.
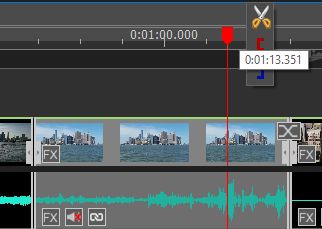
This first clip needs to be reduced to about 14 seconds. I can do this by making a 'cut' at 14 seconds and discarding the remaining 3 seconds. In Timeline (switch from Storyboard to Timeline if you're in Storyboard), grab the red 'play bar' at the top and drag it to the right. As you move it across it will tell you where you are at in seconds. I have dropped the red line at about 14 seconds and a pair of scissors has appeared.
Click on the scissors and the clip will be cut into two at that point. I have clicked on the picture to the right of that red line and you can see in the information box that the bit I cut off is 3 seconds long; the part to the left of the red line is 14 seconds long; and the two parts together make up the 17 seconds.
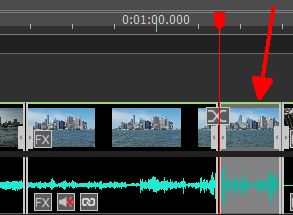
Note:If you make a mistake at any point in this program, look at the top left hand corner and you will see a blue 'back arrow'. Click on it and it will take you 'back' one step to where you were before.
Making sure I have clicked on the right of the red 'play line' I now press the DELETE button on my laptop .. and that 3 seconds has gone.
This is what is now showing on my Timeline. That first clip with the American flag is now 14 seconds long, and this clip is immediately followed by the next clip.
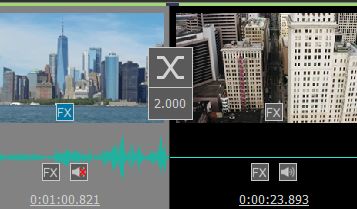
The X showing between clips is the one to click on for Transitions. So click on the X between the first and second clips.
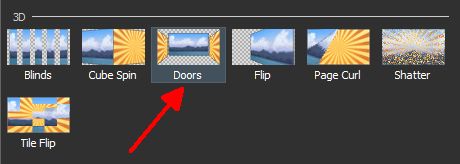
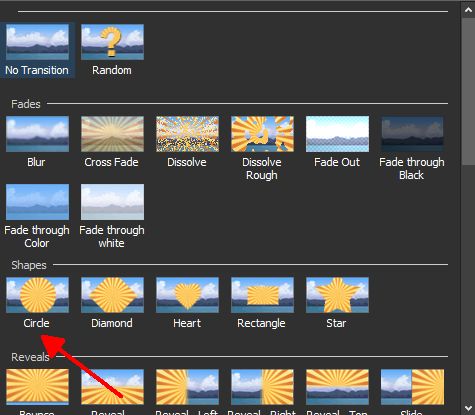
I want 'opening doors' as my first Transition. So when the choices come up, scroll down to the bottom and click on Doors.
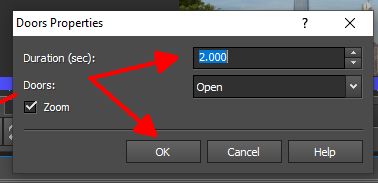
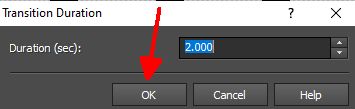
You then get this come up (choices at every step of the way!). Duration of 2 seconds is fine, so click OK.
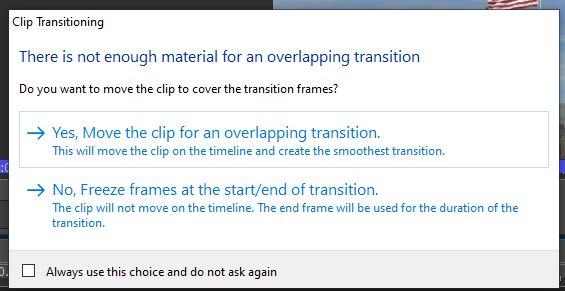
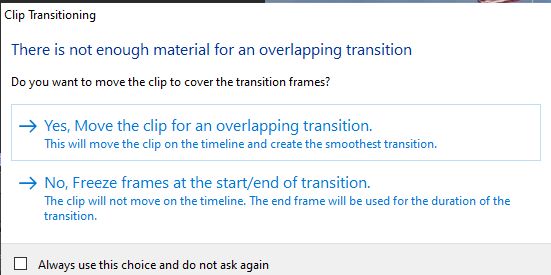
Another choice! Yes, I do want my two clips to overlap for a smooth transition .. so click on Yes, Move the clip for an overlapping transition.
All is now set up to put in my Title .. which I shall do in my next post.
It's all about the music ♫ ♪ ♫ Organ: Yamaha AR80 & Keyboard: Tyros 4 .. Challenge Winner 2021 May (Joint Winner); July; September 2022 July; August 2023 April; June; September
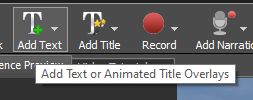
You can create a Title for your video in several ways. For example, you could put a coloured rectangle at the front of the video (Add Blank) and have some scrolling text going up it. But for the Title I want to do I want to 'overlay' the first video clip with some text. Before you start doing the Title make sure the red 'play line' is over on the left (on 0:00:00.000 on the Timeline). VideoPad will put your Text Box where the red line is. If you look at the options above the viewing screen, the one I will choose is Add Text (indicated by the red arrow).
Hover your mouse over and it will say this:
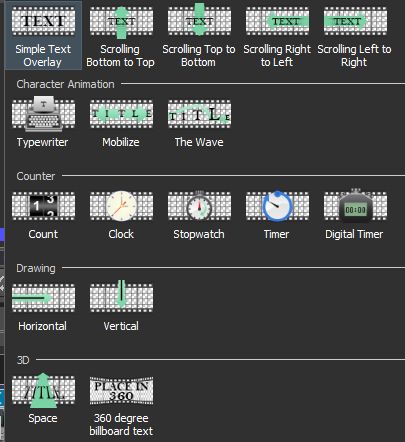
Click on Add Text and you get these choices:
I want Simple Text Overlay ( .. don't want any 'scrolling').
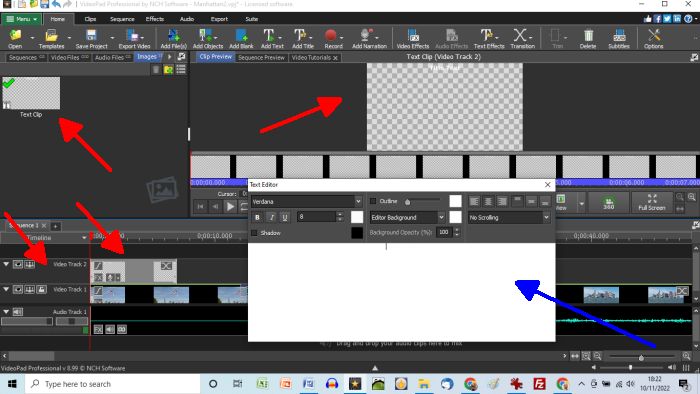
When you click on that you get everything set up ready to put your Text in. I am showing you the whole screen so you can see what it puts and where.
A 'see through' rectangle is placed in Images in the 'bin' (top left). The 'chequerboard' background is telling you it's 'see through'.
At the bottom there is another track on the Timeline, Video Track 2 (just above Video Track 1). The position of this chequerboard box shows you what part of the video it will 'overlay'. If you want this text box in a different position you can click with your mouse and drag it along the Timeline (along Video Track 2) to where you want it. Eg. Instead of a title, you could type "This is me sitting at the top of Mount Everest" .. and then drag it along to where you have a picture of Mount Everest. But mine is going to be the Title, so I'll leave it at the start.
As this is an Image, the default 'time' for the Text Editor to show is 7 seconds. This is what was set up for VideoPad when we went through the Options.
Top right is the 'viewing screen', which is on Clip Preview. The chequerboard background is quite obvious here.
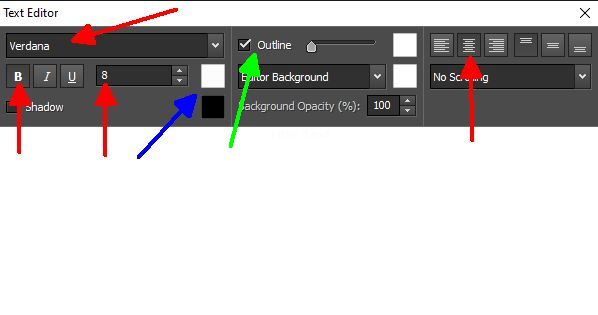
And then you have the Text Editor itself (indicated by the blue arrow) which is where you choose your Font; Font Size; Bold/Italics/Underline; the colour you want your text .. and over to the right .. if you want it left aligned; centered, or right aligned. I want mine centered (which is the 'default' anyway). You type your text in the white box.
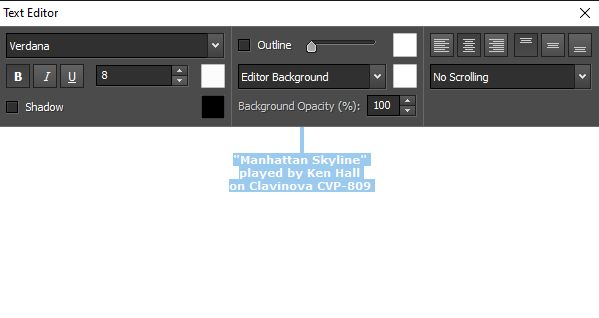
I'll now show you the Text Editor on it's own so you can see what I have chosen.
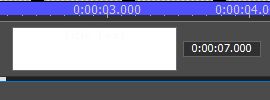
By the way, as that Text Editor is quite large and hides everything behind it, the default is to show it as a smaller rectangle (as below).
In this mode it is showing the time of 7 seconds. You can always change the time of a still photo or image by going into the time showing and changing it to something else. Although I will want my text to show for more than 7 seconds, I also said I would 'sync' it with the doors 'opening'. This is done another way, which I'll show you in a minute.
To get the Text Editor up again so you can work in it, double-click in that white rectangle and you'll be back to the below.
IMPORTANT! Note the GREEN line pointing to Outline. In this diagram, this box is 'ticked'. If yours is 'ticked', UNTICK that box. Outline 'thickens' the text and makes it all 'fuzzy'. You won't want that!
My Font is Verdana (click that down-arrow to choose something of your own); Bold; Font Size 8pt (the reason for choosing such a small Font Size is because I am going to ZOOM in on it); and my Font Colour (the blue arrow) is WHITE.
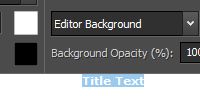
In the version of VideoPad that I have, NCH Software have very annoyingly inserted some text into this text box .. Title Text. A 'hint' as to what to put in this box? I have to highlight and remove those words or they will be showing in my Title!
In later versions of VideoPad those words are not there.
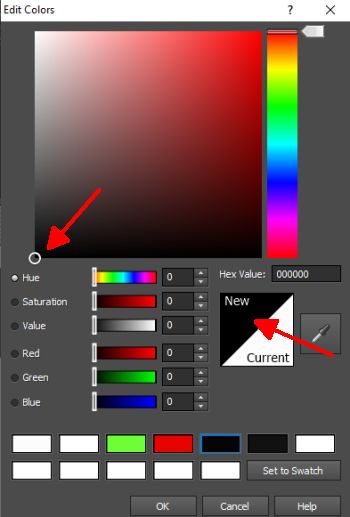
Now I don't know about you, but I cannot see what I am typing if I have it as WHITE on a WHITE background! So I am going to change my Font Colour to BLACK .. then when I have done it, highlight the lettering and change it back to WHITE.
Clicking on that white square indicated by the blue arrow (above) I can choose another colour .. in this case BLACK to replace the WHITE.
Click the OK.
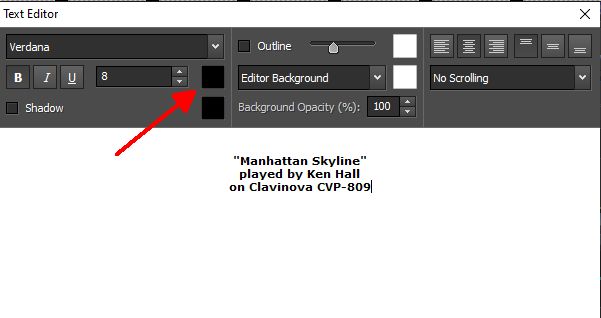
Clicking two 'returns' first (I don't want my title right at the very top!) I have typed what I want in my Title (see the below).
Then I have highlighted my Text and changed the font colour back to WHITE. Then clicked on the X in the top right hand corner to Close and SAVE what I have done.
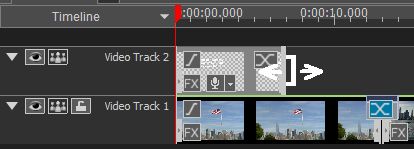
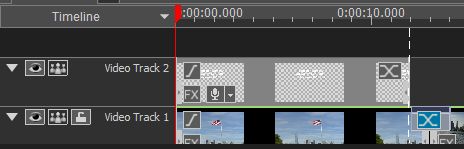
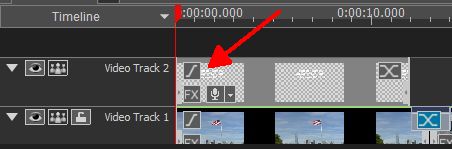
The next thing I want to do is to 'sync' the time the Title shows with the opening of the doors. Hover with your mouse on the right hand edge of the text box in Video Track 2. A mouse cursor appears as below. This enables you to click with the mouse and drag that edge to the right or left to change the TIME of the clip.
Clicking with the mouse, drag the right hand edge of the Title box to the right until you get to the X in Video Track 1 which is the Transition for the Opening Doors. When the Title time is in the right place to 'sync' with the Opening Doors a vertical dotted line will suddenly appear. That's it! You now have everything in the right place for a smooth timed transition.
Next .. to 'Zoom' the Title as we approach those opening doors.
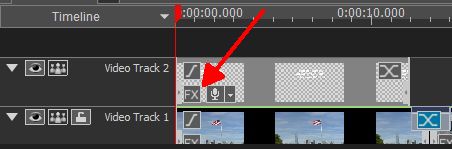
To do this we need the Pan & Zoom (sometimes called the Ken Burns Effect). On any clip, you get the drop-down Effects box by clicking the FX. So do that for the Text box as indicated by the red arrow.
Note: When setting up anyEffect it is a good idea to double-click on the image you are dealing with on the Storyboard or Timeline in order to bring it up into the DISPLAY area, top right. If you don't do this, you may find your Effect added to all the other clips in addition to the one you are currently dealing with.
If you can't see any of the functions we need in the Text box because it is too small (see below) ..
.. then 'expand' the Timeline by clicking on that Zoom at the bottom right (as explained earlier) ..
.. and slide the bar to the left of it so you are on the Timeline where you want to be.
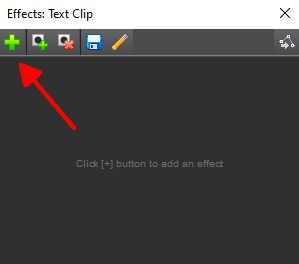
Clicking on the FX gives you this drop-down box.
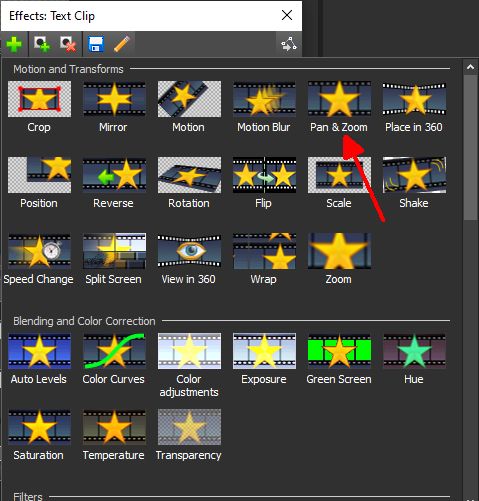
Click on the GREEN+ and you get all the Effects showing to choose from.
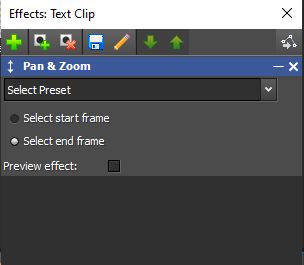
The one to click on is Pan & Zoom.
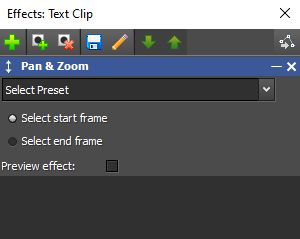
This is what you see.
How does this work?
You get a Start Frame and an End Frame. The Start Frame rectangle fills the screen at the start. The End Frame rectangle fills the screen at the end. And what you see gradually moves through time from one to the other.
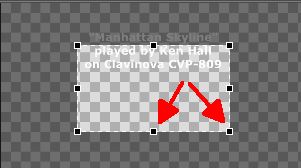
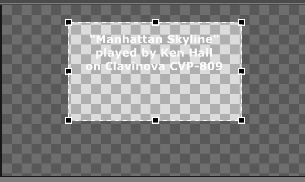
Select start frame is selected as the whole frame. This is what I wanted .. for the text to appear in the 'sky' area, so the words are nearer to the top of the rectangle rather than in the middle.
Click on Select end frame.
We get this. Not quite covering the Text as we want.
So for the end frame we need to re-size the rectangle and move it to cover the words in the Text.
To re-size the rectangle you grab one of the small black squares along the edges or corners with the mouse and drag it to the size you want. The whole rectangle will alter keeping that 16:9 ratio. When you have the rectangle the right size (large enough to cover the Text) moving the mouse inside the rectangle will give you a NorthSouthEastWest cursor. Click within the rectangle and you can drag it to where you want it. I want the zoomed letters to be in the 'sky' portion of the picture so I position the frame as below. This rectangle you see with the text in it will 'fill the screen' so as the lettering just about fills that rectangle from left to right this will have the effect of 'zooming'.
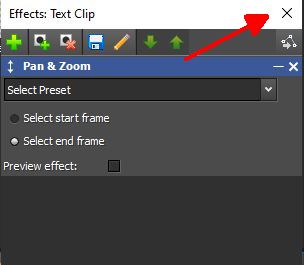
To Close and SAVE what you have done, click that X in the white area at the top (clicking the white X in the blue area will 'abort' what you have done).
Just a couple more things to do and then I'll show you how all this has ended up.
Rather than have the Title 'suddenly' appear, then 'suddenly' crash out, I will fade in the wording, and fade it out at the end.
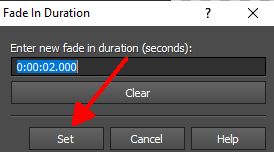
Going back to the Text box on Video Track 2, the Fade In is the f as indicated.
Click on this and click Set for the default time of 2 seconds.
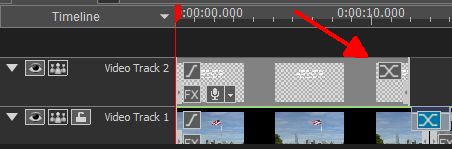
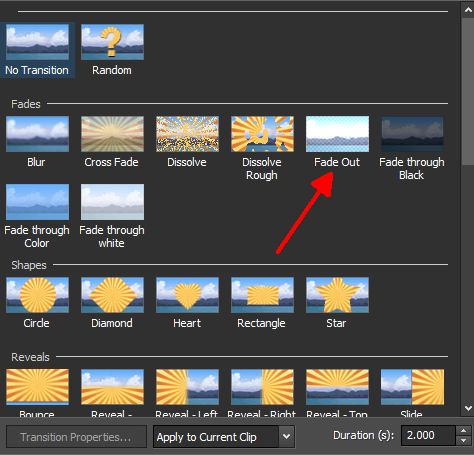
The Fade Out is a Transition, so click on the X ...
... and choose Fade Out.
This time click the OK for the default of 2 seconds.
Phew! Hope you are still with me! Of course there are easier ways of doing a Title, but I like how this way works. In my explanation above I have tried to cover all the pitfalls, so if things don't quite end up as you're expecting you'll know why. Once you get the hang of what is going on (and know what you want to achieve) it only takes a couple of minutes to actually do a Title this way.
I can watch the result of my efforts by making sure the red 'play' line is fully over to the left, the tab at the top is showing Sequence Preview .. and then clicking on the Play arrow in the DISPLAY area.
Now is a good time to Save Project File As... and give it another number. I have got up to Manhattan5.vpj. The idea of saving as you go along is so if you make a mess of something later on, you can always go back a step to where you were before.
Below is how this video I am doing for (with) Ken has ended up (so far!).
It's all about the music ♫ ♪ ♫ Organ: Yamaha AR80 & Keyboard: Tyros 4 .. Challenge Winner 2021 May (Joint Winner); July; September 2022 July; August 2023 April; June; September
To move all the clips into Storyboard in one go, click on the first one, hold down the SHIFT key, click the last one, and drag them all into the Storyboard frame. If you want just 3 or 4 out of a whole bunch then click the first one you want, hold down the CONTROL key and select the others. These will go in as you want.
Den
Keyboards: Yamaha Tyros 4, PSR SX700, PSR S970and StagePa300 I knit dolls and animal toys. I always try to do things which I can't do in order to learn how to do them. .. Werk maakt je vrij. Muziek maakt je blij. Work sets you free. Music makes you happy. .. Challenge Winner 2020 September (Joint Winner); November 2021 May (Joint Winner) 2023 May; August (Joint Winner)
Thanks Den. I had tried that .. but was confused as it appeared that the first clip I had clipped on was no longer selected and only the last one was active. But you're quite right, when holding and dragging them down to the Storyboard it actually says +10 as I am moving them. Hugh
It's all about the music ♫ ♪ ♫ Organ: Yamaha AR80 & Keyboard: Tyros 4 .. Challenge Winner 2021 May (Joint Winner); July; September 2022 July; August 2023 April; June; September
Continuing with this Project, I will put in the next Transition (and the remainder are all done the same way). I am back in Storyboard mode and will click the X between the clips to set the Transition.
But first I want to point something out to you .. and that is the green bar running along the top of the video clips (indicated by the red arrow). When you load a large file into Storyboard (eg. an MP3 or an MP4) it doesn't go in instantly. It takes time for the program to do it .. and this is the significance of the green bar. It will move slowly from left to right across the top of the clip you are loading. Only when it has reached the right hand end has the file been completely loaded in. You should wait for the program to do this and not try doing anything until it has finished.
The Transitions come up when I click that X. .
This time I will choose a circle
Again, it will ask me if I want to overlap the clips. Yes, I do, as this makes for a smoother Transition. Note that every time you do this it overlaps 1 sec for each clip, so you lose 2 seconds along the Timeline.
Note: Any time you want to know what Transition you had chosen, just hover your mouse over the X and it tells you.
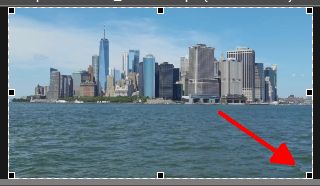
I am now looking at the next clip. It runs for 1 minute, is fairly static (except for the waves moving) and has a lot of sea in the foreground.
I could CUT this clip to make it shorter. But instead, I will PAN it 'across the screen'. First, double-click on the picture in Video Track 1 to bring it up into the DISPLAY area, then click on the FX, click the GREEN+ to get the Effects showing, and choose Pan & Zoom.
You get the same screen whether you are doing a 'Zoom' or a 'Pan'.
This time I shall do a Pan.
How does this work?
You get a Start Frame and an End Frame. The Start Frame rectangle fills the screen at the start. The End Frame rectangle fills the screen at the end. And what you see gradually moves through time from one to the other.
For a Pan we need two rectangles exactly the same size, one positioned on the left hand edge, and the other positioned on the right hand edge .. and both at the same level.
Select start frame is showing the picture as the whole screen.
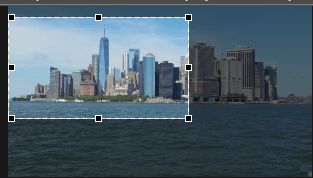
This time, that is not what I want. So I shall grab that black square in the bottom right hand corner and move the rectangle upwards and to the left. Hovering over the rectangle with the mouse I get the NorthSouthEastWest cursor enabling me to grab the rectangle and position it where I want it .. on the left hand edge and a tad down from the top.
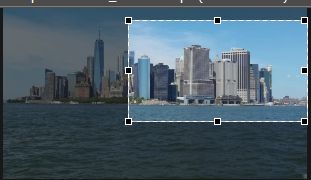
I now click on Select end frame, adjust the rectangle so it is roughly the same size as the first one .. and grab it and position it to the right hand edge. The two rectangles should be roughly the same size, and at the same level. You can 'toggle' between the Start and End frames to check how you're doing.
Think about what will happen here. The clip starts on the left hand edge, and gradually it moves across to the right hand edge. ie. the picture has been 'panned' from left to right.
To Close (and SAVE) what you have done, click on that X on the WHITE bar at the top (don't click on the WHITE X in the blue area or it will abort what you have just done).
A good idea here to do a Save Project As... and give it another number.
Looking at the next clip, there is movement over the buildings .. so I shall use that clip 'as is'.
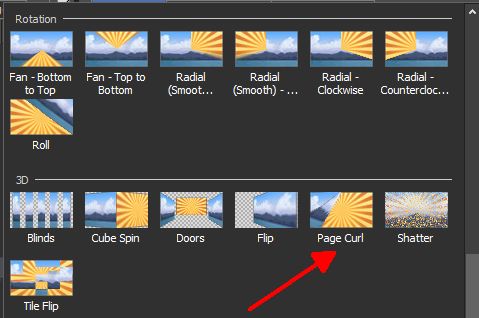
For the Transition I shall do a Page Curl.
Click on the X between the two clips and choose Page Curl (scroll down to near the bottom).
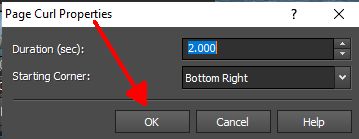
And click the OK for the 2 seconds of Page Curl duration.
How am I doing so far?
Below is a DEMO of how it is all panning out at this point (pardon the pun!).
It's all about the music ♫ ♪ ♫ Organ: Yamaha AR80 & Keyboard: Tyros 4 .. Challenge Winner 2021 May (Joint Winner); July; September 2022 July; August 2023 April; June; September
Did you notice a little 'glitch' towards the end as my video ran through that Pan? That is really annoying me! It's a bit like recording some music and playing a wrong note. It will be there every time I watch the video.
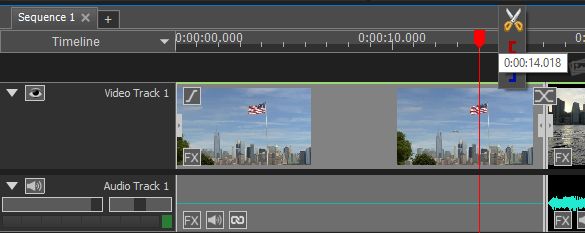
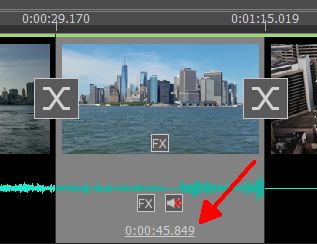
I did say that I had done a Save Project File As... as I was going along, so have gone back to the one just before I did the Pan (double-clicked on the .vpj file in File Explorer). Have watched the clip through .. and yes, the glitch is there in the original clip. The person taking the footage must have knocked the camera without realising. To find out exactly where this has occurred, in Timeline mode I have grabbed the red 'play line' from the left hand edge and dragged it across, watching for that 'glitch' in the DISPLAY screen. The video clip is stable until about 1min 15secs from the start.
The scissors are showing, so I have CUT the video clip just before the 'glitch'.
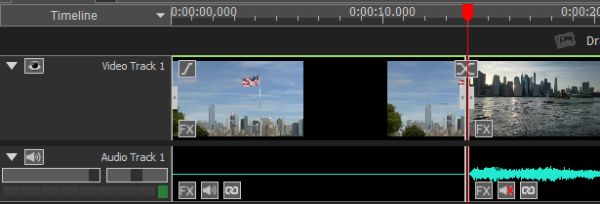
Clicked on the right hand section of the cut and pressed the DELETE on my laptop.
I now have a video clip without the 'glitch'. It is obviously shorter than it was before, and switching to Storyboard mode it tells me the time of my 'cut' video clip .. just over 45 seconds.
I shall now do my 'pan' again with the two rectangles, one on the left and one on the right, and put the Circle and Page Curl Transitions back .. and put a YouTube DEMO back up so you can see how it has all panned out this time.
The moral of this story? Make sure you watch a clip right through to make sure it is what you are expecting. You can always CUT the video clip if there is a part of it you don't want to see. In one of the videos I did I wanted a Church Organ being played. At the start of it, the organist was making an announcement to the congregation. So I cut out that bit so I just had the organist playing his organ.
It's all about the music ♫ ♪ ♫ Organ: Yamaha AR80 & Keyboard: Tyros 4 .. Challenge Winner 2021 May (Joint Winner); July; September 2022 July; August 2023 April; June; September
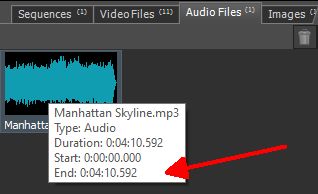
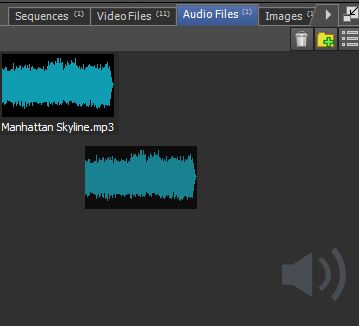
To carry on from this point I need to check out the time of Ken's MP3. In the 'bin' (top left) I have clicked the tab Audio Files and hovered my mouse over Ken's MP3. It tells me it lasts for just over 4mins 10secs, so I need enough video clips to cover this.
Please Note: I haven't put Ken's audio MP3 track into the mix yet. I prefer to get the video part done to approximately fit the audio time. What I have found is that if I put the audio in earlier, if I do things to a video clip (like CUT it) .. it will do unwanted things to Ken's audio as well.
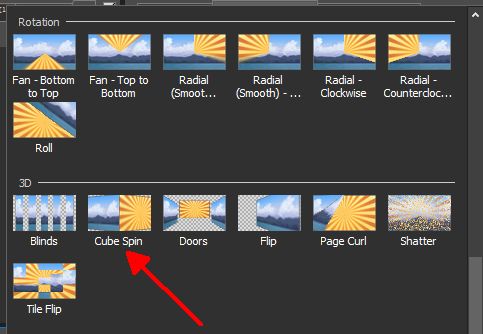
Well, I do have enough video clips (just about) so am proceeding to put Transitions between them all, and do another Pan on a couple more. One Transition I would like to show you is Cube Spin. I have used this when bringing in the Manhattan Suspension Bridge.
Click on that X for Transitions and scroll down near the bottom to find the Cube Spin.
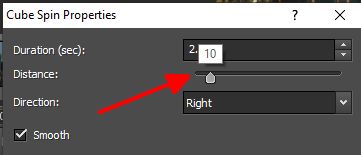
Click that and you get to confirm the Cube Spin Properties.
The duration of 2 seconds is perfect. It's the second one, Distance that's important. This determines how far back from the screen the cube goes back and spins. The 'default' is zero .. which means the cube doesn't spin at all! The best number to have this on is 10, so slide the slider along until you get that number. The other options showing are the defaults.
You'll see how this pans out (sorry, not pans out .. spins out) when you watch the final YouTube video.
I'm just about ready to put Ken's MP3 into the Project. Bearing in mind that each time I have done a Transition I have had to overlap the two video clips on either side by one second (to get a smooth Transition) I have lost 2 seconds of time on every Transition I have done.
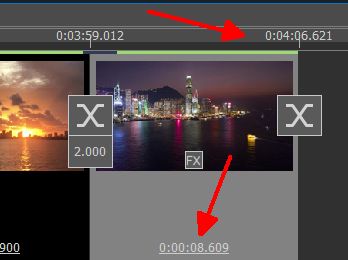
The below is a screenshot of the end of the video track.
The total time of my video Project is 4min 6.6 secs .. and Ken's MP3 is 4min 10.5secs So I need to extend the overall time by about 5 secs to cover the MP3. If I needed a lot more time I would import another video clip
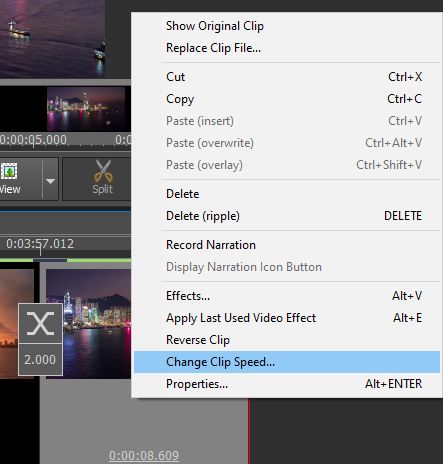
The length of that final video clip is 8.6 seconds. One thing I can do to extend the length of the video is to change the speed of a video clip. First, double-click on that last video clip in Video Track 1 to get it into the DISPLAY screen. Do a right-click anywhere over the video and you get these options in a drop-down box.
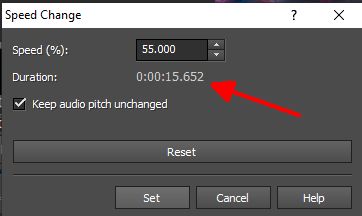
There are quite a few options in here. One is Effects.... So if you wanted to, you could go down this route to get at the Effects instead of clicking on that FX. The one I want here is Change clip speed, so click that. You change the clip speed by a percentage. Choosing 55% I reckon will do it (you can see the new timing for the clip as they tell you).
Click on Set.
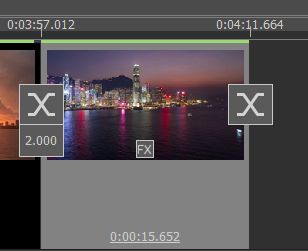
The end of the VIDEO now looks like this. Enough time now to handle Ken's MP3.
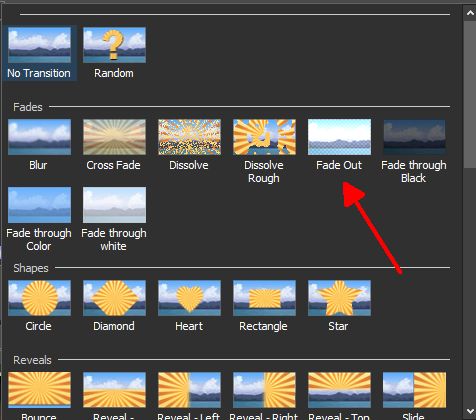
By the way, I shall set that last X Transition as a Fade Out.
It's all about the music ♫ ♪ ♫ Organ: Yamaha AR80 & Keyboard: Tyros 4 .. Challenge Winner 2021 May (Joint Winner); July; September 2022 July; August 2023 April; June; September
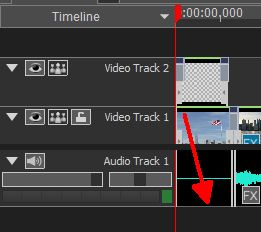
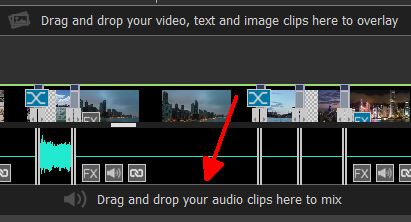
To do this you have to be in Timeline mode. Look at the left of the VideoPad screen. The Timelines are Video Track 2; Video Track 1; and Audio Track 1 (this is the track that has the audio bits that were attached to some of the video clips). The place where you drop the MP3 Audio is in the black area underneath that.
In the middle of the screen, at the bottom it says this:
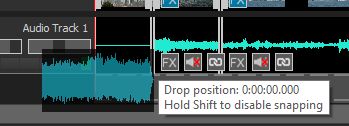
Make sure that your red 'play line' is at the Start (on zero) and do just that. Click on the Audio Files tab in the 'bin' and grab and drag the MP3 down to that very bottom area.
As you get near, it will show the 'start' time where it is dropping it off. You want this to be zero ie. where the red line is at the Start.
With that Drop position showing as 0:00:00,000 (ie. at the START) release the button on the mouse. You can see from the below that not only has the MP3 been dropped off by the red line at the Start, but it has also given this Audio Timeline a name .. Audio Track 2.
I just want to point out that loudspeaker icon on this MP3 audio track. By clicking on that you can move the slider at the top to change the VOLUME of the whole clip (as a %). You can make the music quieter .. but you can't make it louder.
I want now to look at the end of the Timeline and see how I have done with ending the music at the end of the video.
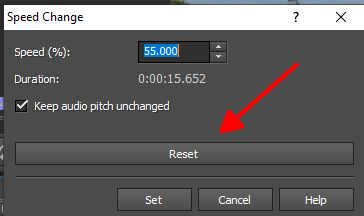
Well, that was pretty perfect. The music ended and the video faded away immediately after. If I hadn't got it quite right I would have done a right-click on that last clip, chosen Change Clip Speed..., clicked on the Reset (which would put that clip back to 100%) .. and then put that 55% either up or down until I had got it right.
I have listened to the whole video, watching it in the DISPLAY screen, and it's fine.
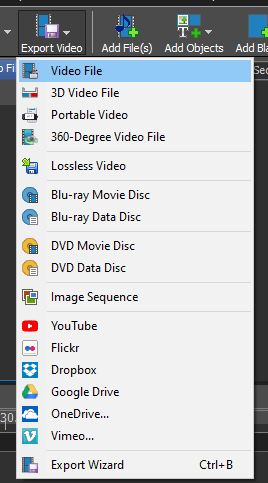
Next step is to SAVE the video as an MP4, ready to upload to YouTube. Will be doing this in my next post.
It's all about the music ♫ ♪ ♫ Organ: Yamaha AR80 & Keyboard: Tyros 4 .. Challenge Winner 2021 May (Joint Winner); July; September 2022 July; August 2023 April; June; September
When the video options come up, choose the ones as shown by the red arrows.
Give your Project a File Name. Make the 'path' where it is to be saved the same as the Folder where all your Project information is. For Preset choose Widescreen TV. The other options are the defaults. Leave them as they are. Click on Create (at the bottom). It'll take a while. Go make a cup of coffee. The final MP4 should be in the Folder where all your Project information is. When it has done it, the box will ask you if you want to Play it (why not?) or go to the Folder where the MP4 file is. This information box will stay here until you close it down.
If you want to run the MP4 file from the Folder it's in, double-click on the file name to run it.
It's all about the music ♫ ♪ ♫ Organ: Yamaha AR80 & Keyboard: Tyros 4 .. Challenge Winner 2021 May (Joint Winner); July; September 2022 July; August 2023 April; June; September
I have now uploaded this video to YouTube so you can take a look at how it has all worked out .. particularly the lead in with the 'zooming' Title. Also note the Cube Spin Transition as the clip of the Manhattan Suspension Bridge comes into view.
Any clarification or questions about what I have put up, please feel free to do a POSTREPLY.
Hugh
It's all about the music ♫ ♪ ♫ Organ: Yamaha AR80 & Keyboard: Tyros 4 .. Challenge Winner 2021 May (Joint Winner); July; September 2022 July; August 2023 April; June; September
You are doing well, everything seems to be panning out just right.
If you wanted to put in a Title without it scrolling over a picture then you could make up a Start Frame and insert that as a jpg. I have done this for some of my videos. It saves sorting out the title in VideoPad. Basically it is a jpg with the information, generally an "advert"' like this.
I have done this jpg 1920 x 1080 pixels (ie. it is 16:9 ratio).
You would put this at the Start (ie. at 0:00:00,000) on the same line as your video clips (Video Track 1). Put the MP3 music at the Start as usual. The video would then show this screen before going into your main video clips.
Den
Keyboards: Yamaha Tyros 4, PSR SX700, PSR S970and StagePa300 I knit dolls and animal toys. I always try to do things which I can't do in order to learn how to do them. .. Werk maakt je vrij. Muziek maakt je blij. Work sets you free. Music makes you happy. .. Challenge Winner 2020 September (Joint Winner); November 2021 May (Joint Winner) 2023 May; August (Joint Winner)
1. If you want to add a picture or video clip in between two others that are already on that Video Track 1 line, make sure you are in Storyboard mode and then grab the image from the 'bin' and drop it where you want it. In Storyboard mode it only drops clips between existing clips. I have been in Timeline mode before when doing this and it has dropped it in the middle of another clip and it switches between one and the other as you Play it.
2. I had a problem with a Pan & Zoom adding that effect not only to the clip I was doing it on, but doing it to every other clip I had in the line. I then had to go to every clip and remove a Pan & Zoom by clicking on the white X on the blue bar. I contacted NCH Software about this and they said I must have the clip I am applying the effect to 'firmly' showing in the DISPLAY screen before I do the Pan & Zoom. They told me to 'double-click' the clip in Video Track 1 to get it into the DISPLAY screen .. and only then do the Pan & Zoom.
Hugh
It's all about the music ♫ ♪ ♫ Organ: Yamaha AR80 & Keyboard: Tyros 4 .. Challenge Winner 2021 May (Joint Winner); July; September 2022 July; August 2023 April; June; September


 ..
..